Practice Makes Permanent: Guitar Strumming Lesson

I was watching a video on Scott's Bass Lessons YouTube channel, and the guest they had on said, “Practice Makes Permanent.” That expression struck a nerve for me. I knew instantly what he meant and reflected on how my guitar progress had been impacted by practicing things wrong for so many years. To sum it up, the old expression “Practice Makes Perfect” only applies if you are doing things correctly. If you never correct improper technique but continue to practice incorrectly, you are only hindering yourself from truly growing. This applies to anything in life. If you don’t correct bad technique and continue practicing incorrectly, eventually, the bad technique becomes permanently set in your brain and will require a lot of effort to break.
The issue I never took the time to fix correctly was my strumming technique. The proper technique for guitar strumming is to have your hand very relaxed and loose. Your hand is supposed to flow with the beat of the song and never stop. This means that if a chord is ringing out, you don’t stop strumming; you simply move your hand slightly out of the way so you don’t strum any strings. This is important because it helps prevent you from losing the rhythm. For the longest time, I had a problem with this. I would constantly stop the motion of my hand, which would then kill the rhythm of the song, and I would lose track when playing along with the song.
The best way to properly practice this technique is to take it very slow. I suggest using a metronome and setting it to a slow pace, such as 60 beats per minute. The focus here is on the strumming hand; use your fretting hand to mute all the strings. The goal is to have your strumming hand hit the guitar on the downbeats. Start by hitting the first beat with a down strum, then continue strumming up and down without hitting the strings. You only want to strum the guitar on the first beat of each measure. This will require a lot of practice and patience. Please take it slow.
It's best to approach guitar strumming with note durations. Each click of a metronome represents a quarter note. Start slow by strumming up and down with the metronome, but only hit the strings on the quarter notes. We’ll call these the down strums. After some practice, it’s time to incorporate the up strums too. Normally, when you combine a down and up strum, they form eighth notes. Count them as 1 AND, 2 AND, 3 AND, 4 AND. The "AND" represents the up strum. Remember, the part I failed at for many years was keeping your strumming hand in continuous motion the whole time.
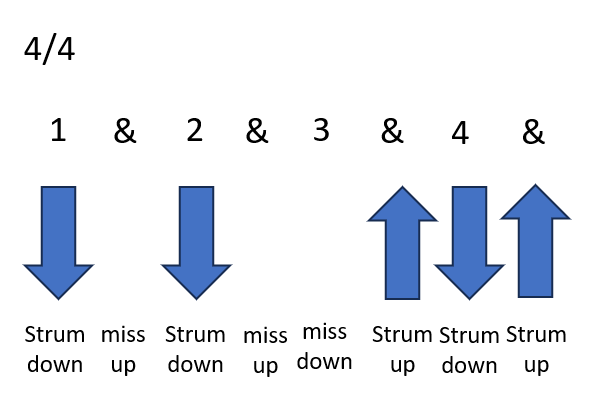
Now that we've gone over the very basics of guitar strumming, there are fun patterns to work on. One of the most popular guitar strumming patterns is DOWN, DOWN, UP, DOWN, UP. What does this mean? First, set your metronome to a slow beat per minute. Listen to the count. The first beat is a down strum hitting the guitar strings, then you strum up to keep the motion but do not hit the strings. The next beat is another down strum, but again, do not hit the strings on your up strum. Now you’re going to miss the next down strum and instead hit the up strum, followed by a down and up strum to finish the count. The full motion of strumming goes as follows: strum the first downbeat, skip the first up strum, strum the second downbeat, skip the second up strum, skip the third downbeat, strum the third up strum, and strum the fourth down and up strum. After a while, it will be time to start incorporating some chords and changing them after the patterns are completed.
Here is a visual showing the strum pattern:

Another good tool to help understand strumming patterns is using YouTube. I like to search for songs and add "guitar track only" to the search. If you find just the guitar track, it is easier to follow along. From there, I like to slow the speed down to 75% so I can get a clearer listen to the pattern. Try to write out the rhythm and slowly work on getting it down, then increase your speed little by little.
I hope you found this article helpful!